CaptureX · macOS 14+
Features & how to use them
Frame the content with smart selection, then make your annotations stand out in HDR. See real exported samples and the steps, formats and requirements for capture, recording and editing.
HDR for screenshots
Brighter emphasis. Details intact.
Give highlights, arrows and text up to 4× luminance gain. Mark what matters and save an HDR image, all in the same CaptureX editor.
- Capture, then enable HDR
- Annotate and adjust brightness
- Export with HDR preserved
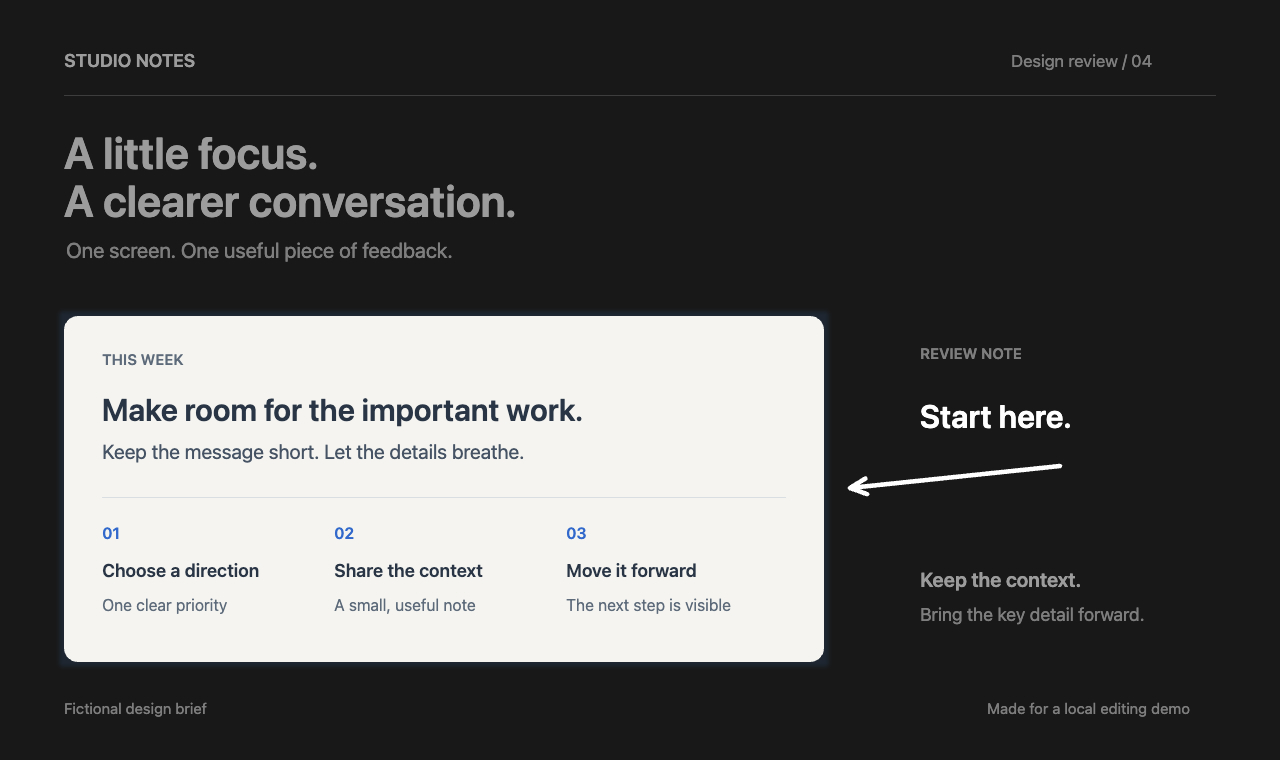
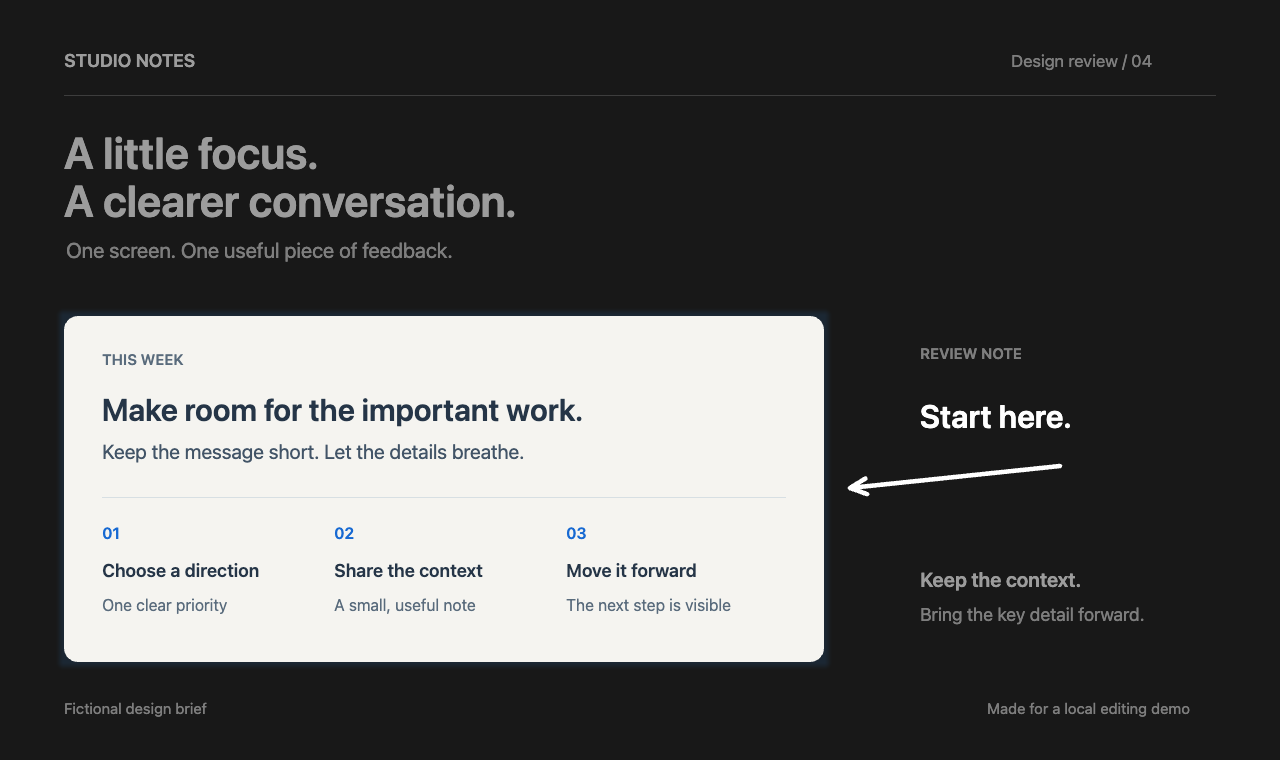
An output sample made with fictional content, edited and natively encoded by CaptureX. Text in the sample is in English.
HDR and SDR versions of the same edit. Extra brightness requires an HDR-capable display and browser; otherwise, the two images may look similar.
- Edit & save
- macOS 15+. HDR annotations default to HEIC; PNG (16-bit PQ) and JPEG (gain map) also preserve HDR.
- Live HDR preview
- macOS 26+, an HDR display and WebGPU HDR support. Other environments show an SDR preview; macOS 15+ can still save HDR.
- Everyday copying
- Copy, Pin and drag-out use SDR. Export an HDR image to retain extra brightness. Your source stays unchanged.
Screenshots & recognition
| Feature | How to use it | Good to know |
|---|---|---|
| Smart selection: windows & regions | Press the shortcut, point at a window to snap to its edges, then click. Or drag a freeform region.⌃ ⇧ A | No second Enter confirmation. Adjust the boundary before your first edit. |
| Repeat last region | Press the shortcut to capture your last selected area again.⌃ ⇧ G | Reselect after a display or scaling change. |
| Smart selection: web & tables | Hold Shift, move to another element, then click or press Enter. No need to hold the mouse button. Select across rows, columns and merged cells. | Main panel → More → Enable element selection and grant Accessibility access. Needs page support. Frames the start and current elements; elements passed along the way are not added. Use freeform selection if recognition is unavailable. |
| Exact sizes | Click the width × height badge to enter dimensions. Choose px/pt in Settings. | Choose a common size or reuse recent sizes. |
| Scrolling screenshots | Select an area → Scrolling capture → scroll manually or start automatic scrolling → finish. | Watch the live preview. Capture pauses if matching is unreliable or the target is obscured. |
| Annotations & color | Choose arrows, text, shapes, mosaic or measurements directly on the toolbar. Find background and shadow beside Rotate. | Select and move annotations directly; undo, redo or press Delete to remove them. The original stays intact. |
| OCR & translation | Select OCR after capture. Choose a target language to translate, then copy either text. | Available before annotating or transforming the image. Translation needs macOS 15+ and installed system language packs. |
| QR codes | After capture, click a detected QR result to open its link. | QR recognition is local; links never open automatically. |
| HDR annotation editing | Turn on HDR in the toolbar, then add highlights, text, tags or arrows. Adjust brightness in the tool options, up to 4×. | Requires macOS 15+. Live preview needs macOS 26+ with WebGPU HDR display support; otherwise you see SDR. Actual brightness depends on display headroom. |
| Save with HDR intact | Choose HEIC, PNG or JPEG from Export. HDR annotations default to HEIC; PNG uses 16-bit PQ and JPEG uses Adaptive HDR. | All three HDR formats need macOS 15+; appearance depends on the receiving app. Whole-image copy, pin and drag-out use SDR. Failed saves keep your edits without silently discarding HDR. |
- Smart selection: windows & regions
- Press the shortcut, point at a window to snap to its edges, then click. Or drag a freeform region.⌃ ⇧ A
- Good to know:No second Enter confirmation. Adjust the boundary before your first edit.
- Repeat last region
- Press the shortcut to capture your last selected area again.⌃ ⇧ G
- Good to know:Reselect after a display or scaling change.
- Smart selection: web & tables
- Hold Shift, move to another element, then click or press Enter. No need to hold the mouse button. Select across rows, columns and merged cells.
- Good to know:Main panel → More → Enable element selection and grant Accessibility access. Needs page support. Frames the start and current elements; elements passed along the way are not added. Use freeform selection if recognition is unavailable.
- Exact sizes
- Click the width × height badge to enter dimensions. Choose px/pt in Settings.
- Good to know:Choose a common size or reuse recent sizes.
- Scrolling screenshots
- Select an area → Scrolling capture → scroll manually or start automatic scrolling → finish.
- Good to know:Watch the live preview. Capture pauses if matching is unreliable or the target is obscured.
- Annotations & color
- Choose arrows, text, shapes, mosaic or measurements directly on the toolbar. Find background and shadow beside Rotate.
- Good to know:Select and move annotations directly; undo, redo or press Delete to remove them. The original stays intact.
- OCR & translation
- Select OCR after capture. Choose a target language to translate, then copy either text.
- Good to know:Available before annotating or transforming the image. Translation needs macOS 15+ and installed system language packs.
- QR codes
- After capture, click a detected QR result to open its link.
- Good to know:QR recognition is local; links never open automatically.
- HDR annotation editing
- Turn on HDR in the toolbar, then add highlights, text, tags or arrows. Adjust brightness in the tool options, up to 4×.
- Good to know:Requires macOS 15+. Live preview needs macOS 26+ with WebGPU HDR display support; otherwise you see SDR. Actual brightness depends on display headroom.
- Save with HDR intact
- Choose HEIC, PNG or JPEG from Export. HDR annotations default to HEIC; PNG uses 16-bit PQ and JPEG uses Adaptive HDR.
- Good to know:All three HDR formats need macOS 15+; appearance depends on the receiving app. Whole-image copy, pin and drag-out use SDR. Failed saves keep your edits without silently discarding HDR.
Recording
| Feature | How to use it | Good to know |
|---|---|---|
| Window & region recording | Switch your selection to recording and click Start recording, or enter recording from the main panel. | Adjust the region and dimensions before starting. |
| Audio & camera | Choose system audio, microphone and camera in recording settings. Check levels and preview. | Permissions, devices and storage are checked before recording. Save up to 16 named presets. |
| Pause, resume & retake | Use the control bar to pause or resume. In More, mark a good take or retake the segment. | Retakes preserve the original segment; restore it in the editor after stopping. |
| Cursor & camera appearance | Choose cursor style, click effects, camera mirroring and position in recording settings. | Editable cursors can be changed later. The native-cursor mode records the cursor into the source. |
| Interrupted recordings | Follow the device warning, then open Recovery from the main panel after an interruption. | Completed source segments are preserved. Recovery can be retried. |
- Window & region recording
- Switch your selection to recording and click Start recording, or enter recording from the main panel.
- Good to know:Adjust the region and dimensions before starting.
- Audio & camera
- Choose system audio, microphone and camera in recording settings. Check levels and preview.
- Good to know:Permissions, devices and storage are checked before recording. Save up to 16 named presets.
- Pause, resume & retake
- Use the control bar to pause or resume. In More, mark a good take or retake the segment.
- Good to know:Retakes preserve the original segment; restore it in the editor after stopping.
- Cursor & camera appearance
- Choose cursor style, click effects, camera mirroring and position in recording settings.
- Good to know:Editable cursors can be changed later. The native-cursor mode records the cursor into the source.
- Interrupted recordings
- Follow the device warning, then open Recovery from the main panel after an interruption.
- Good to know:Completed source segments are preserved. Recovery can be retried.
Video editing
| Feature | How to use it | Good to know |
|---|---|---|
| Trim & choose tracks | After stopping, trim in the video editor and select the audio and camera tracks to keep. | Preview and export share the same edit. Source files stay unchanged. |
| Clear narration | Narration audio → Clear narration. Adjust strength and compare with the original. | Requires a separate microphone track. Local processing; cancel or restore the original. |
| Auto focus | Generate focus shots from clicks, then adjust their position, timing and zoom. | Requires recorded clicks. Disable, undo or regenerate at any time. |
| Captions | Choose a caption language and audio source, generate and edit the text, then burn it in or export SRT. | Requires local offline recognition and permission. Up to 2 hours and 2,048 captions. |
| Output versions & framing | Add landscape or portrait in Output versions. Choose picture-in-picture, split view or screen only in camera framing. | Up to 8 output versions, each with its own caption and camera layout. |
- Trim & choose tracks
- After stopping, trim in the video editor and select the audio and camera tracks to keep.
- Good to know:Preview and export share the same edit. Source files stay unchanged.
- Clear narration
- Narration audio → Clear narration. Adjust strength and compare with the original.
- Good to know:Requires a separate microphone track. Local processing; cancel or restore the original.
- Auto focus
- Generate focus shots from clicks, then adjust their position, timing and zoom.
- Good to know:Requires recorded clicks. Disable, undo or regenerate at any time.
- Captions
- Choose a caption language and audio source, generate and edit the text, then burn it in or export SRT.
- Good to know:Requires local offline recognition and permission. Up to 2 hours and 2,048 captions.
- Output versions & framing
- Add landscape or portrait in Output versions. Choose picture-in-picture, split view or screen only in camera framing.
- Good to know:Up to 8 output versions, each with its own caption and camera layout.
Export & revisit
| Feature | How to use it | Good to know |
|---|---|---|
| Copy, export & pin | Click Copy or press ⌘Enter to copy the whole image. Choose PNG/JPEG/HEIC directly from the Export arrow menu, or pin from the toolbar. | Copy uses SDR; HEIC needs macOS 15+. Success closes the editor; failure or cancellation keeps your edits. |
| Video, GIF & source files | Click Export video, or open its arrow menu for GIF or All source files. | GIFs are up to 15 seconds. All source files export into an ordinary folder. |
| History & editing again | Open History to copy or edit again. Rename an item from More. | Screenshot edits create a new result; recordings reopen their existing project. |
| Shortcuts & settings | Settings → Shortcuts to customize keys. Escape closes a menu or cancels one level at a time. | Advanced settings stay optional. Everyday capture needs no setup checklist. |
- Copy, export & pin
- Click Copy or press ⌘Enter to copy the whole image. Choose PNG/JPEG/HEIC directly from the Export arrow menu, or pin from the toolbar.
- Good to know:Copy uses SDR; HEIC needs macOS 15+. Success closes the editor; failure or cancellation keeps your edits.
- Video, GIF & source files
- Click Export video, or open its arrow menu for GIF or All source files.
- Good to know:GIFs are up to 15 seconds. All source files export into an ordinary folder.
- History & editing again
- Open History to copy or edit again. Rename an item from More.
- Good to know:Screenshot edits create a new result; recordings reopen their existing project.
- Shortcuts & settings
- Settings → Shortcuts to customize keys. Escape closes a menu or cancels one level at a time.
- Good to know:Advanced settings stay optional. Everyday capture needs no setup checklist.
Capture, editing and History are processed on your Mac. Only checkout, license operations and update checks you start use the network. They never send media, recognized text or file paths.